Tired of the same old multi-tools offered by the big brands? Seen them all before and own half of them already? How about some ideas on how you can customize your multi-tool and make it your own, impress yourself and your family and friends?
Here are 11 amazing tips that you can use to modify your multi-tool and turn the cool dial up to 11!
1. Attach a paracord lanyard
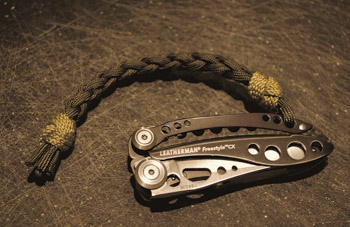
You’ve probably seen the bracelets made out of knotted paracord. The idea is that by wearing the bracelet around your wrist, you’re always prepared if you need some paracord to get you out of your next MacGyver situation.
The same thinking applies to attach a paracord lanyard to your multi-tool. Not only do you have a multi-tool to help get you out of trouble but you’ll also have some rope conveniently attached to it. Use it to lower yourself out of a burning building or something.
Obviously, you need a multi-tool with a lanyard hole but a lot of multi-tools have one these days. If you can’t find one, check your instructions or the manufacturer’s website because some of the lanyard holes slide out from the body of the multi-tool and can be hard to find. Sometimes the lanyard hole can be quite small so attach a small split ring to the lanyard hole and you will be able to put a more substantial paracord on it.
A paracord lanyard can add some color, texture, and interest to your multi-tool. As a bonus, they can also make it easier to grab it out of your pocket whether you have it clipped to your pocket or not. If you live in a colder climate and are wearing gloves outside, a lanyard hanging out of your pocket gives you something easy to grab on to.
You can add even more style and functionality to your lanyard by adding a bead to your paracord lanyard. Beads can be anything from a CNC machined and anodized titanium square to a sculpted skull.
Like the idea of adding a lanyard but don’t know how to tie a paracord lanyard? There’s plenty of video how-to’s on the tube and there are plenty of different types of lanyard designs. You can start here.
2. Engrave it with your favorite phrase
Make your multi-tool your own by getting something engraved on it. You could put your name on it but that’s a bit boring, isn’t it? I’m sure you have a favorite phrase or a significant date or something that would look great engraved on the side of your multi-tool.
Some brands like Leatherman offer to engrave for free when you order. But if your multi-tool brand doesn’t offer it or you already own it, you can drop down to your local engraver and get it done. It’s usually pretty inexpensive, just know what you want to be engraved before you get there.
The obvious place to have something engraved is on the scales (the handles). Or you could try somewhere different. Any metal surface that’s flat enough will work. What’s about the knife blade or any of the other tools? This option is a good one for multi-tools that have composite plastic handles as well.
3. Add a pocket clip
Some multi-tools come already equipped with a pocket clip, some don’t come with a pocket clip but the brand has the option to purchase one separately and some just don’t have any options to add a pocket clip. This pimp up obviously only works for the first two options.
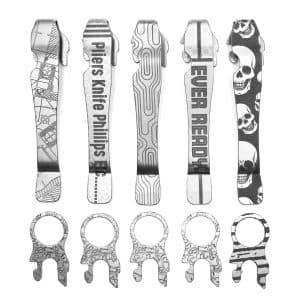
Because I like to pimp my multi-tools, I decided to have a pocket clip and lanyard ring made for me. It replaces the standard Leatherman stainless steel pocket clip for the Wave, Surge, and Charge. It installs in the same quick release way as the OEM version but it’s made of premium titanium and comes in 5 custom laser etched designs. Modestly priced but will give you a custom look to your Wave, Surge or Charge.
If your multi-tool already has a pocket clip that means it has a place and a way to attach a pocket clip. And that means you have the option to change the standard issue pocket clip for a version that suits your style better. Your brand could have other pocket clip versions for your model so check out their website.
The other way to get this done is to buy an aftermarket pocket clip. A search of the interwebs should turn something up that works for you.
4. Make your own sheath
Your multi-tool doesn’t come with a sheath or you don’t like the standard sheath? Maybe you can get a nylon sheath but you want a leather one. Well if you’re a bit handy with your hands, and being a multi-tool MacGyver I know you are, why not make your own?
There are lots of how-to videos on the tube, like this one that shows you how to make your own sheath in leather. Looks like fun and you can design it how you like it and add compartments to it to carry additional bits if you want. You might like to carry your bit set or a phone or flashlight or even a wallet. That’s the point, you decide what it looks like, what type of leather you want and what you want to carry.
5. Sharpen your large flat screwdriver into a pry bar or blade
If you’ve got the sharpening equipment and the skill to use it, this mod is a simple enough task that you can do it yourself in your toolshed. If you can’t do that, then it’s easy enough to drop over to your local friendly knife sharpening service.
The large screwdriver you have on your multi-tool can be sharpened into a small handy knife. Or depending on the edge you put on it, you could turn it into a pry bar. Either way, it’s pretty useful to have a small cutting tool handy for opening packages and stuff. OK, if you do this mod you’ll no longer have a large screwdriver but often you’ll have another screwdriver size on your multi-tool or maybe you don’t use a flathead screwdriver. Choices, choices….
6. Change out your straight blade to a combo blade or serrated for a straight…
If your multi-tool comes with a straight blade, you can change it up by replacing it with a serrated blade or maybe a combination half straight, half serrated blade. Or if you have a serrated blade, maybe replace it with a straight blade. You get the idea. Gerber has replacement knife blades for some models or replace a blade with a file tool for a TSA compliant multi-tool you can carry onto the plane with you.

Texas Tool Crafters sell funky damascus blade replacements for a range of Leatherman models. If you don’t want to do the modding yourself, these guys also sell a range of modified Leatherman multi-tools ready to ship. For the full pimped outlook, check out their gold-plated models.
7. Mix and match your scales and tools for a custom color combination
This tip suits the MacGyver who’s happy to have two of the same model of multi-tool. Often brands will offer a multi-tool in more than one color combination. They might have a stainless silver version and a black version. If you get hold of a stainless steel version and a black version, you can mix and match parts from each version to customize the look of each one. You could swap out the black knife blade for the stainless one and vice versa. Or change one or both the handles. Lots of options here. There are other multi-tools that come in different colors. For example, the Leatherman Leap comes in Green, Blue, and Red versions. If you buy two (or go crazy and get all three colors!) of the same multi-tools but in different colors, you can easily mix the color of the handles to give them a custom look. If you decide you don’t need two of the same model, once you’ve got your perfect modded version, you can give the other one away as a gift or even sell it as a unique item.
8. Change some of the tools for other more useful tools
You’ve decided you like your multi-tool a lot (because you chose wisely after reading my article on how to chose the right multi-tool for you!) but after carrying it around for awhile you decided there is one or a couple of tools you don’t use.
Why not change out the tool you don’t use for a tool you will? SOG, for example, offer changeable parts for some of their multi-tools so you could replace the tool you don’t use.
Or if you can’t find the right tool to use as a replacement, you could always just remove the unused tool. Fill the gap you leave with a washer or some other sort of spacer. By getting rid of the tool you make it easier to get to the other tools as well as saving some weight to carry around.
9. Anodize your scales
The most common colors for multi-tools are silver or black. If you’re lucky, they might have other colors but these are less common. Maybe the silver version is stainless steel or anodized silver or it could actually be titanium. Black is usually a black oxide finish, anodized black or a burnished finish.
Changing the color of your scales (the handles) by anodizing works best on stainless steel or titanium. You can anodize metal at home with a few ingredients and an electrical charge. As is the way these days, the tube has a lot of tutorials you can watch to show you how to get this done. If you’re someone who likes to learn a new skill or you can see a lot of things that you think would look good anodized, you could easily get hooked on anodizing.
If all that sounds like too much trouble, look for a local anodizing company. You can disassemble the parts you want to anodize (or the anodizer might even do this for you) and take it to the anodizer. Choose a color or colors you want and wait to be impressed by the results. My experience is that anodizing isn’t very expensive either so for a small outlay, you can own a custom multi-tool.
If you don’t want to do any work at all to get an anodized multi-tool, Texas Custom Crafters have some models available online.
10. Blue your scales
Another way to change the color of your multi-tool steel bits is to blue them. This is sometimes called heat anodizing because that’s a better description of how this is done. By heating steel with a blow torch, it changes color from blue to purple depending on how long you heat it. You may have seen blued steel. If you’re also into the knife world, thumb studs are often blued steel.
You can blue steel at home easily by using a blow torch. As usual, you can learn how this is done on the tube. In a nutshell, you unscrew the steel handle covers from your multi-tool, clean them with rubbing alcohol and heat them with a blow torch until they start changing color. OK, so you have to consider a couple of other things but there isn’t really much to it.
If you are concerned about burning yourself or the dog with the blowtorch, I’m sure there are companies around you who can do this for you.
11. Change the grind on your blade edge
This mod is a subtle one and one for the real blade aficionados out there. Some multi-tool blades come out of the package and they just aren’t that sharp. So the first thing to check is whether the blade is sharp and if, not sharpen it yourself, or get it sharpened.
You won’t have to bother about sharpening your multi-tool knife if you’re going to change the grind on it. A common grind for multi-tools is a high flat grind and that style might not suit what you use your knife for. High flat grind knives are easy to sharpen up in the wild so they are often used on survival style blades. The downside is they go blunt fairly quickly.
So different grinds have different characteristics. Some grinds can be sharpened to a fine edge, some hold their edge better than others or some are more robust than others. So if you want to change your grind, it’s probably best to go to your local sharpening service and tell them what you want. The Knife Depot has a good short article on the different types of grinds, how to recognize them and what they are good for.
For the latest multi-tool images, modded multi-tools and other cool EDC stuff, follow me on Instagram
So that’s 11 great ways to customize your multi-tool and really make it your own. Do you have some other tips for modding your multi-tool? Let me know in the comments below.